SOS Reward for SecureDrop Work

Earlier this year, I made a submission to the Secure Open Source Rewards program, for some code contributions I had made to the SecureDrop server code. My submission got accepted and I received a $10,000 reward for my work.

The SOS Rewards program is described as follow:

The Secure Open Source Rewards pilot program financially rewards developers for enhancing the security of critical open source projects that we all depend on. The pilot program is run by the Linux Foundation with initial sponsorship from the Google Open Source Security Team (GOSST).

If you are a developer and have made contributions to “proactively harden critical open source projects and supporting infrastructure against application and supply chain attacks”, you should definitely submit your work to the program!

The program’s scope is broad and very different kinds of contributions might get accepted:

  • Any open-source project that’s popular-enough could be valid as a “critical open source project and supporting infrastructure”. As part of my submission, the SecureDrop project did qualify.
  • The program is not focused on security vulnerabilities. Instead, code-level contributions (refactors, test suite improvements, etc.) are what’s on scope. Hence, contributions that are not specifically about fixing a vulnerability will qualify, and developers who may not have a background in security can still make useful contributions and get rewarded.

What follows is what I submitted to the program for my work on SecureDrop, as an example of a submission that got accepted.

My Submission: Criticality

This rewards program is limited to critical open source projects. What makes an open source project critical? It should be a popular and widely used project that has a critical impact on infrastructure and user security. Projects that come to mind are popular web frameworks or libraries, decompression libraries, crypto libraries, mail servers, databases, network services, and security or toolchain dependencies of any critical projects themselves. In the response below, please explain in as many words as you feel are needed why this project is critical.

SecureDrop is an open-source whistleblower submission system used by more than 100 news organizations in the world, including the Guardian and the New York Times. It allows whistleblowers to securely and anonymously send documents to journalists.

While this project may not be a web framework or library, I believe it does match the requirement of a “widely used project that has a critical impact on infrastructure and user security”. The project is used by prominent news organizations and NGOs all around the world, and has been instrumental in uncovering important news stories exposing corruption and crime.

My Submission: Tell us more about the work

Please tell us what the improvement is and explain how it works, its complexity, and the security impact (including links to CLs). If the improvement required a lot of effort to complete, tell us why in detail. Include any information that may convince us that the improvement has a demonstrable, significant, and proactive impact on security. If this submission is similar to a previous submission, please let us know and tell us how this one is different.

The work was to review and significantly refactor the code in SecureDrop responsible for encrypting documents submitted by whistleblowers to journalists. The goal was to make this code simpler and more readable, improve type-checking, and make its test suite more comprehensive. While working on this, I discovered a minor security issue in the encryption code, fixed it as part of the work, and added some unit tests to prevent future regressions.

My changes were released as part of SecureDrop version 2.2.0 (entry #6174 in https://github.com/freedomofpress/securedrop/blob/release/2.2.0/changelog.md).

I split my changes into three Pull Requests on GitHub, which contain more details about the changes:

More details about the changes follow.

The encryption logic in securedrop leverages the GPG binary, and is called from Python; it was a very complex and confusing piece of code. This complexity:

  • Made it easy for SecureDrop developers to make mistakes when calling or modifying the encryption code.
  • Made it difficult for both security auditors and automated tools to review/check the code. Additionally, any bug in the encryption code could have a devastating impact on the overall security of the application, and hence the users/whistleblowers. This is why I decided to work on significantly simplifying it.

While working on this refactoring, I built a new test suite that I designed to be more comprehensive than the existing one. This test suite uncovered a minor security issue related to how the GPG binary works when used by the SecureDrop server:

  • Each whistleblower that wants to submit documents has a GPG passphrase attached to their SecureDrop account, and stored on the SecureDrop server.
  • Because of how the GPG agent was configured, GPG passphrases were automatically cached by the GPG binary, causing decryption operations to succeed even if the wrong GPG passphrase was supplied in the SecureDrop code.
  • This issue was un-exploitable by itself. If an attacker were able to discover another vulnerability in the server code, they could trick the SecureDrop server into decrypting another user’s documents. However, after reviewing the server code with the SecureDrop team, no such vulnerability was found, making the initial issue un-exploitable in the current code base.
  • There are more details about the issue in the first PR at https://github.com/freedomofpress/securedrop/pull/6174.
June 15, 2022
appsec

What is Stored Log4Shell?

Note: I initially posted this article on Data Theorem’s blog.

What is “Stored Log4Shell” and how is it different than the regular Log4Shell issue?

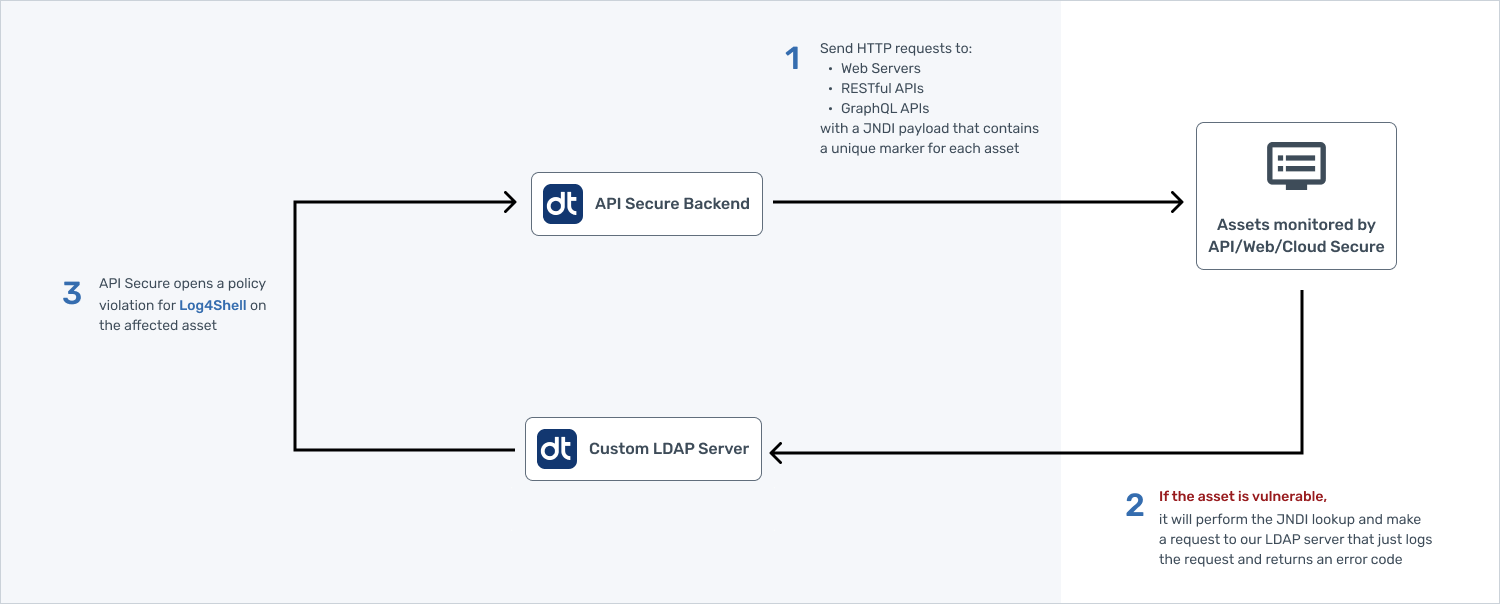
The following diagram describes how Data Theorem, the company where I work, detects APIs and servers vulnerable to Log4Shell:

During our analysis, we noticed the Log4j callback connection can take from a few seconds, which is the norm, to several hours for the LDAP request to be sent to our exploit server (step 2 in the diagram). This LDAP request is what indicates that an application is vulnerable to Log4Shell, but why would it take so long for the exploit to be run?

We investigated and uncovered the following scenario:

  1. A web application receiving our Log4Shell payload is not vulnerable: it does log the payload (for example as part of the User-Agent header) to a file, but it doesn’t use a vulnerable version of the Log4j library to do so. Hence, the exploit is not triggered at that time.
  2. Later, a second, separate application processes the log files generated by the initial web application. This second application uses a vulnerable version of the Log4j library and logs some data extracted from the initial application’s logs. This is when the exploit gets triggered, and this explains why it would happen hours after sending it.

We’ve dubbed this a “stored” Log4Shell issue: the payload gets stored to a file, and, at a later stage, it reaches a vulnerable application which then gets exploited.

We’ve seen an example of this with S3 buckets that have S3 Access or CloudTrail enabled for logging HTTP requests sent to the bucket:

  • In one of the environments we scanned, a Java application was configured to process a bucket’s access logs every few hours.
  • This Java application was using a vulnerable version of the Log4j library, and was logging specific content extracted from the bucket’s logs, thereby triggering the exploit.

This increases the impact of Log4Shell, because applications that are not directly accessible to an attacker, from the Internet, can still get compromised via a “stored” Log4Shell. It also makes it difficult to identify which specific application is vulnerable, among all the applications that might process your web logs. In this situation, the IP address that opened the connection to the LDAP server can help pinpoint the application.

December 22, 2021
appsec

SSLyze 5.0.0 Released

I just released a new major version of SSLyze, a Python library for scanning the SSL/TLS configuration of a server: SSLyze 5.0.0.

This major release focuses on improving the reliability of the scans, simplifying the Python API and JSON output, and adding support for checking a server’s TLS configuration against Mozilla’s recommended configuration. The full changelog is available here.

In this new version, SSLyze will check the server’s scan results against Mozilla’s recommended “intermediate” TLS configuration, and will return a non-zero exit code if the server is not compliant.

$ python -m sslyze mozilla.com
Checking results against Mozilla's "intermediate" configuration. See https://ssl-config.mozilla.org/ for more details.

mozilla.com:443: OK - Compliant.

The Mozilla configuration to check against can be configured via --mozilla-config={old, intermediate, modern}:

$ python -m sslyze --mozilla-config=modern mozilla.com
Checking results against Mozilla's "modern" configuration. See https://ssl-config.mozilla.org/ for more details.

mozilla.com:443: FAILED - Not compliant.
    * certificate_types: Deployed certificate types are {'rsa'}, should have at least one of {'ecdsa'}.
    * certificate_signatures: Deployed certificate signatures are {'sha256WithRSAEncryption'}, should have at least one of {'ecdsa-with-SHA512', 'ecdsa-with-SHA256', 'ecdsa-with-SHA384'}.
    * tls_versions: TLS versions {'TLSv1.2'} are supported, but should be rejected.
    * ciphers: Cipher suites {'TLS_ECDHE_RSA_WITH_AES_256_GCM_SHA384', 'TLS_ECDHE_RSA_WITH_CHACHA20_POLY1305_SHA256', 'TLS_ECDHE_RSA_WITH_AES_128_GCM_SHA256'} are supported, but should be rejected.

This can be used to easily run an SSLyze scan as a CI/CD step.

Maximum automation with GitHub Actions

After Travis CI announced that they were going to restrict usage for open-source projects, I decided to switch to GitHub Actions for SSLyze’s CI/CD.

I have been very happy with the change; one of GitHub Actions’ best feature is its seamless support for the three main OSes: Linux, macOS and Windows. Previously, supporting each of them would require using a different CI/CD product (such as AppVeyor for Windows). As SSLyze has a C component and needs to work on all three OSes, this has been a huge improvement.

Using GitHub Actions, I added a bunch of CI/CD workflows to reduce how much work an SSLyze release is. These workflows might be useful to other Python projects, especially the ones with a C extension:

Further improving the reliability of scans

One important goal with SSLyze is to ensure that it is able to scan any web server without any issues. Most TLS scanning tools (including previous versions of SSLyze) will randomly crash when pointed at specific server stacks.

Improving the reliability of scans has been an ongoing effort and with the latest release, more automated testing in CI/CD has been implemented:

  • Using GitHub Actions to spawn a server and run a full SSLyze scan against it, for the following web servers: Apache2, Microsoft IIS and nginx.
  • Within the unit tests, running an SSLyze scan against Cloudflare and Google servers.

Based on usage statistics of web servers, the combination of Apache2, Microsoft IIS, nginx, Cloudflare and Google represents ~93% of all web servers on the Internet.

Running SSLye scans from CI/CD on all these servers helps ensuring that it can reliably scan most of the Internet without any issues.

More details and changelog

For more details, head to the project’s page.

November 27, 2021
ssl

SSLyze 3.0.0 Released

I just released a new version of SSLyze, a Python library for scanning the SSL/TLS configuration of a server: SSLyze 3.0.0.

This has been a big effort and more than 60 000 lines of code were updated, with mainly two goals in mind:

  • Making mass scans of hundreds or thousands of servers a lot more reliable.
  • Making the Python API and the processing of the scan results simpler and easier.

These improvements make it a lot easier to use SSLyze as an automated SSL/TLS scanning tool, for example to continuously monitor and review the SSL configuration of your company’s endpoints by running daily scans.

Issues in previous versions

In previous versions of SSLyze, the scanning logic was often too aggressive with servers: it would open more than 20 or 30 concurrent connections, which would sometimes result in timeouts and failing connections, for servers that were not ready to handle this kind of sudden network load.When scanning a single server, running the scan again would sometimes do the trick, but that solution does not scale when running mass scans of hundreds of hosts.

This was made worse by the fact that the formatting of the scan results returned by SSLyze (both in Python and JSON) made it difficult to detect that a specific scan didn’t work as expected. This could lead to the results being misinterpreted as “everything looks good” ie. SSL issues being missed.

Making scanning more reliable

Starting with version 3.0.0, SSLyze enforces a maximum of 5 concurrent connections per server, regardless of the types of scan (cipher suites, Heartbleed) and the number of server to scans. This limit of 5 has been shown to provide a good balance between speed and success rate of the scans, and can also be lowered or increased as needed. Multiple servers are still scanned concurrently (to allow for speedy scans), but with this limit of 5 concurrent connections per individual server.

Implementing this logic required revisiting design decisions made almost a decade ago in the very first version of SSLyze. The code handling the concurrency was very complicated and used both multi-processing and multi-threading, as a naive way to speed up the scans and get around Python’s Global Interpreter Lock. Ultimately tho, SSLyze is an application that is mostly I/O-bound: its main functionality is to connect to servers and to send/receive data in order to test the servers’ SSL configuration.

Because with I/O-bound programs the impact of the GIL on performance is tiny, I completely refactored the concurrency logic and removed any usage of the multi-processing module; everything is now done via threads using Python’s modern API, the ThreadPoolExecutor. Removing the multiprocessing code also had the side-effect of speeding SSLyze’s start time by half a second.

Making the scan easier to run and process

Throughout the years, SSLyze has evolved from a command line tool to a fully-fledged Python library for SSL/TLS scanning. However, a library is only as good as its API: how easy and convenient it is to use it, in order to get the task at hand done.

In version 3.0.0, I have significantly simplified the Python API; starting a scan looks like this:

# Define the server that you want to scan
server_location = ServerNetworkLocationViaDirectConnection.with_ip_address_lookup("www.google.com", 443)

# Do connectivity testing to ensure SSLyze is able to connect
try:
    server_info = ServerConnectivityTester().perform(server_location)
except ConnectionToServerFailed as e:
    # Could not connect to the server; abort
    print(f"Error connecting to {server_location}: {e.error_message}")
    return

# Then queue some scan commands for the server
server_scan_request = ServerScanRequest(
    server_info=server_info,
    scan_commands={ScanCommand.CERTIFICATE_INFO, ScanCommand.SSL_2_0_CIPHER_SUITES},
)
scanner = Scanner()
scanner.queue_scan(server_scan_request)

Any number of ServerScanRequest can be queued in order to scan multiple servers at the same time; all the available scan commands are documented here. The Scanner class will take care of running the scans concurrently while keeping the network load on each individual server low, in order to avoid any disruption.

Once all the ServerScanRequest have been queued, results of the scan can be retrieved as they get completed by doing the following:

for server_scan_result in scanner.get_results():
    print(f"\nResults for {server_scan_result.server_info.server_location.hostname}:")

    # SSL 2.0 results
    ssl2_result = server_scan_result.scan_commands_results[ScanCommand.SSL_2_0_CIPHER_SUITES]
    print(f"\nAccepted cipher suites for SSL 2.0:")
    for accepted_cipher_suite in ssl2_result.accepted_cipher_suites:
        print(f"* {accepted_cipher_suite.cipher_suite.name}")

    # Certificate info results
    certinfo_result = server_scan_result.scan_commands_results[ScanCommand.CERTIFICATE_INFO]
    print("\nCertificate info:")
    for cert_deployment in certinfo_result.certificate_deployments:
        print(f"Leaf certificate: \n{cert_deployment.received_certificate_chain_as_pem[0]}")

Each scan result contains the result of all the scan commands that were scheduled for a specific server:

  • The server’s details are available in ServerScanResult.server_info.
  • The results of each scan command ran against the server are stored in a typed dictionary in ServerScanResult.scan_commands_results. As shown in the example, each result can be retrieved by passing the corresponding scan command as a key. Each result also has a different format and fields depending on the scan command. These fields are documented and also have type annotations, allowing mpypy to catch mistakes you may make when processing these results (ie. SSLyze is compatible with PEP 561).
  • If any of the scan command failed in any way, the error will be stored in ServerScanResult.scan_commands_errors and no result will be available for this command in ServerScanResult.scan_commands_results.

A more detailed example of using the Python API is available here.

Lastly, it is still possible to run mass scans without the Python API, by just using SSLyze’s command line. To allow processing in any language, results can be written to a JSON file using the --json_out option. Unlike previous versions of SSLyze, the format of the JSON results is now identical to the Python results (same field names and same types) so the documentation is the same.

Benchmark

To test the new version, I ran the following benchmark:

  • Scan the Alexa top 100 sites from a single computer.
    • Among these sites, 6 were not reachable from the U.S (most likely because they’re only accessible from China) so a total of 94 sites were actually scanned.
  • For each site, run 14 kinds of SSL scans/commands (Heartbleed, Robot, cipher suites, etc.).
    • That’s a total of 94 * 14 = 1316 scan commands.
    • This includes for example the testing of 38 950 cipher suites in total (about 400 combinations of cipher suites and SSL/TLS versions per servers).

With the previous version of SSLyze, v2.1.4, the results were the following:

  • The scan took 706 seconds total.
  • 17 scan command failed out the 1316 that were run, most of them due to timeouts (ie. SSLyze being too aggressive).

With the new version of SSLyze, v3.0.0, the results were the following:

  • The scan took 444 seconds total; that’s almost half the time.
  • Only 1 scan command failed out the 1316 that were run.

That’s a pretty big improvement. Additionally, this benchmark was run against very popular sites (the Alexa top 100) that usually can handle the kind of connection spikes that old versions of SSLyze would cause. When scanning less popular sites, the new version of SSLyze will shine even more by consistently returning successful scans.

More details and changelog

For more details, head to the project’s page or the Python documentation.

April 05, 2020
ssl

How SSL Kill Switch works on iOS 12

Two weeks ago, I released a new version of SSL Kill Switch, my blackbox tool for disabling SSL pinning in iOS apps, in order to add support for iOS 12.

The network stack changed significantly between iOS 11 and 12, and it was no surprise that the iOS 11 version of SSL Kill Switch did not work on (jailbroken) iOS 12 devices. This post describes the changes I had to make for the tool to support iOS 12.

Strategy for disabling SSL pinning

Implementing SSL pinning in a mobile application requires customizing the validation logic done by the app on the server’s certificate chain, when the app opens an SSL connection to this server. Customizing SSL validation is almost always done via some kind of callback mechanism, where the application code receives the server’s certificate chain during the connection’s initial TLS handshake, and then has to make a decision on the chain (whether it is “valid”, or not). For example, on iOS:

Hence, the high-level strategy for disabling SSL pinning in applications is to prevent the SSL validation callbacks from being triggered, so that the application code that is responsible for implementing pinning is never exercised.

On iOS, it is relatively easy to prevent the NSURLSessionDelegate validation method from being called (and it is how the early versions of SSL Kill Switch worked), but what about iOS apps that use a lower level API (such as Network.framework)? As each networking API on iOS is built on top of another, disabling the validation callbacks at the lowest level would potentially disable validation for all the higher level network APIs, which would allow the tool to work against a lot more apps.

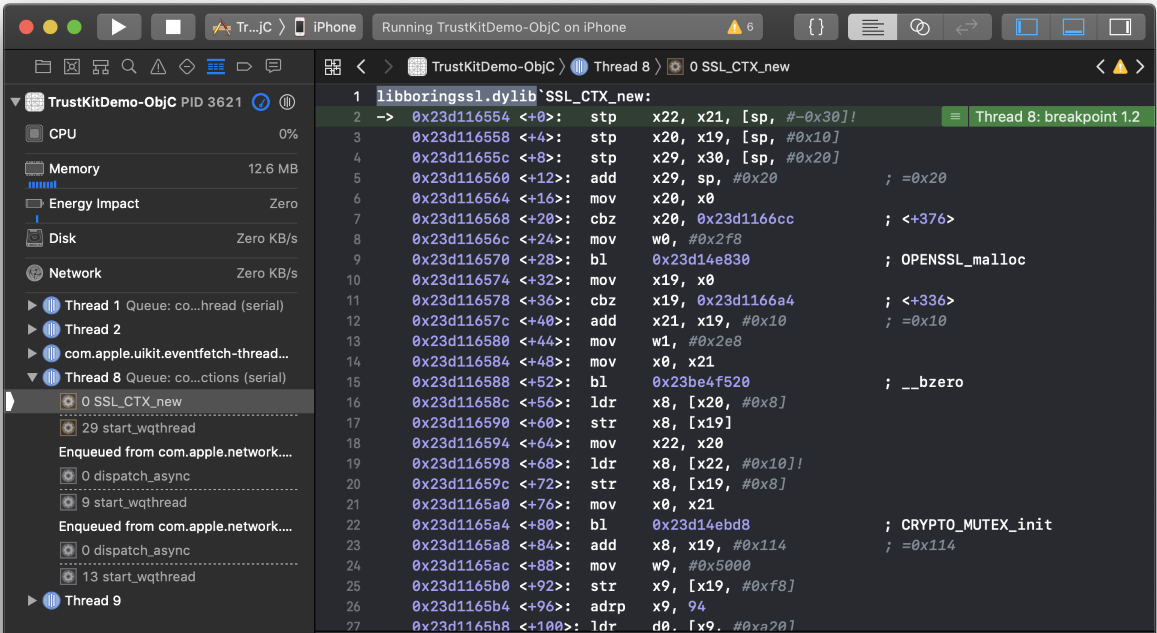
The network stack on iOS in general has been going through a lot of changes since iOS 8, and on iOS 12, the SSL/TLS stack is built on a custom fork (I think?) of BoringSSL. This can be seen for example by setting a breakpoint on a random BoringSSL symbol when running an app that opens a connection:

If you remember the strategy: “prevent the SSL validation callbacks from being triggered”, it is likely that by targeting and patching BoringSSL, the lowest level SSL/TLS API on iOS, all the higher level APIs on iOS (including NSURLSession) would also have pinning validation disabled.

Let’s try!

BoringSSL’s validation callback

When using BoringSSL, one way to customize SSL validation is to configure a validation callback function via the SSL_CTX_set_custom_verify() function:

Here is a simplified example of how it is meant to be used:

// Define a cert validation callback to be triggered during the SSL/TLS handshake
ssl_verify_result_t verify_cert_chain_callback(SSL* ssl, uint8_t* out_alert) {
    // Retrieve the certificate chain sent by the server during the handshake
    STACK_OF(X509) *certificateChain = SSL_get_peer_cert_chain(ssl);

    // Do custom validation (pinning or something else)
    if do_custom_validation(certificateChain) == 0 {
        // If validation succeeded, return OK
        return ssl_verify_ok;
    }
    else {
        // Otherwise close the connection
        return ssl_verify_invalid;
    }
}

// Enable my callback for all future SSL/TLS connections implemented using the ssl_ctx
SSL_CTX_set_custom_verify(ssl_ctx, SSL_VERIFY_PEER, verify_cert_chain_callback);

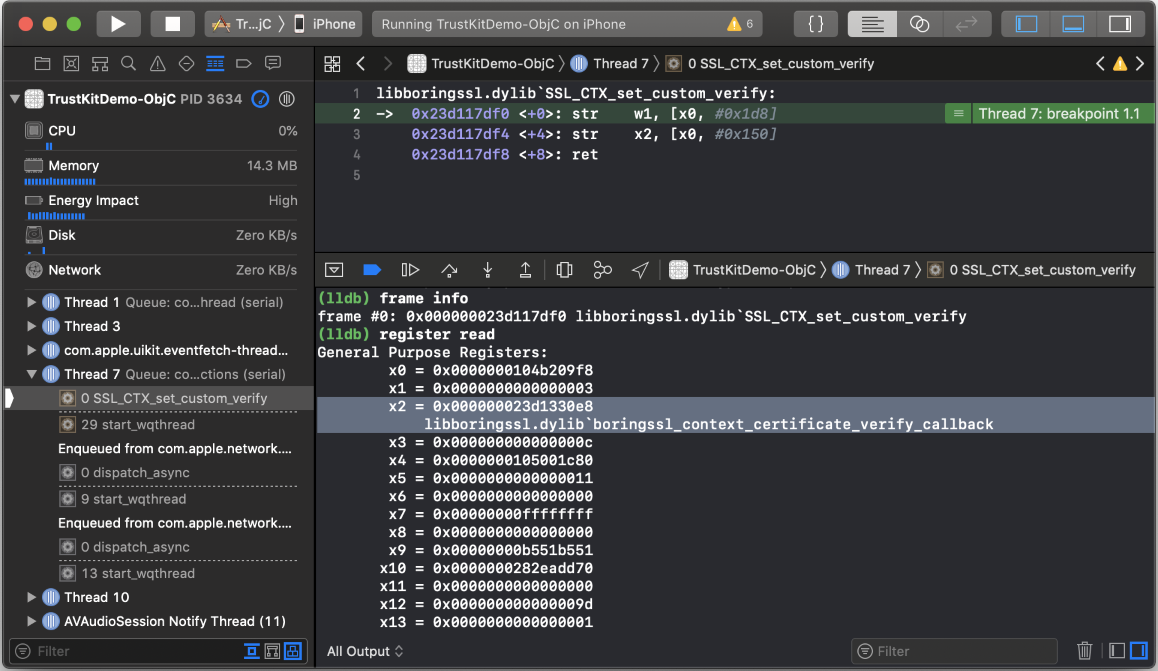
Using a test app with SSL pinning enabled for NSURLSession, I was able to confirm that SSL_CTX_set_custom_verify() does get called when opening a connection:

We can also see the Apple/default iOS validation callback function passed as the third argument (in register x2): boringssl_context_certificate_verify_callback(). It is likely that this callback contains (among other things) logic to set things up for my test app’s NSURLSession callback/delegate method to eventually be called with the server certificate.

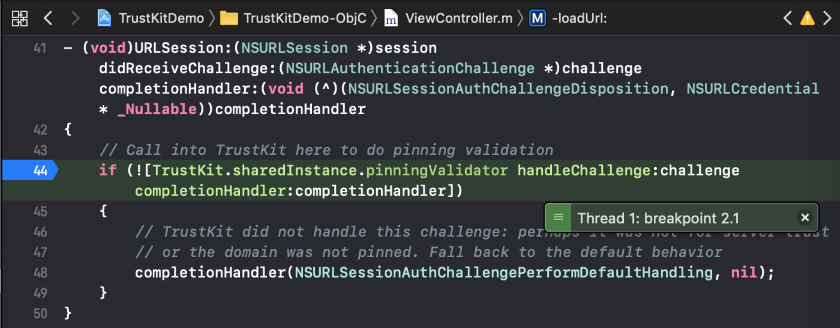
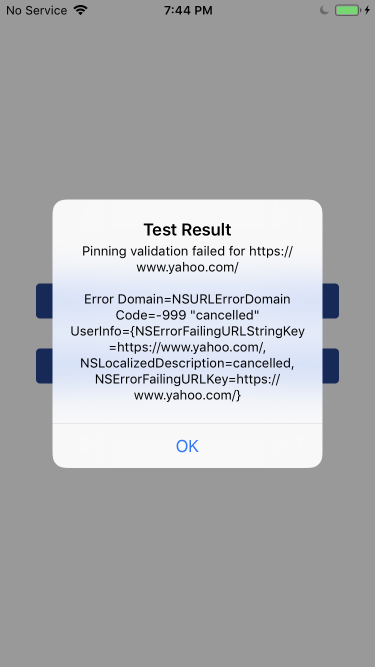
And as expected, my test app’s delegate method for pinning validation code does get exercised:

And I have designed my test app to have its custom/pinning validation logic always fail:

Hence, if I do find a way to bypass pinning, this connection should instead succeed.

Now that we have a plan and a proper test setup (app with pinning, jailbroken device, Xcode, etc.), let’s get to work!

Tampering with BoringSSL

The first thing I tried was to replace the default BoringSSL callback set by the iOS networking stack,boringssl_context_certificate_verify_callback(), with an empty callback that does not check the server’s certificate chain at all:

// My "evil" callback that does not check anything
ssl_verify_result_t verify_callback_that_does_not_validate(void *ssl, uint8_t *out_alert)
{
    return ssl_verify_ok;
}

// My "evil" replacement function for SSL_CTX_set_custom_verify()
static void replaced_SSL_CTX_set_custom_verify(void *ctx, int mode, ssl_verify_result_t (*callback)(void *ssl, uint8_t *out_alert))
{
    // Always ignore the callback that was passed and instead set my "evil" callback
    original_SSL_CTX_set_custom_verify(ctx, SSL_VERIFY_NONE verify_callback_that_does_not_validate);
    return;
}

// Lastly, use MobileSubstrate to replace SSL_CTX_set_custom_verify() with my "evil" replaced_SSL_CTX_set_custom_verify()
void* boringssl_handle = dlopen("/usr/lib/libboringssl.dylib", RTLD_NOW);
void *SSL_CTX_set_custom_verify = dlsym(boringssl_handle, "SSL_CTX_set_custom_verify");
if (SSL_CTX_set_custom_verify)
{
    MSHookFunction((void *) SSL_CTX_set_custom_verify, (void *) replaced_SSL_CTX_set_custom_verify,  NULL);
}

After implementing this as a MobileSubstrate tweak and injecting it into my test app, something interesting happened: my test app’s NSURLSession delegate method was not called anymore (meaning it was “bypassed”), but the very first connection done by the app would fail with a new/unknown error, “Peer was not authenticated”, as seen in the logs:

TrustKitDemo-ObjC[3320:160146] === SSL Kill Switch 2: replaced_SSL_CTX_set_custom_verify
TrustKitDemo-ObjC[3320:160146] Failed to clone trust Error Domain=NSOSStatusErrorDomain Code=-50 "null trust input" UserInfo={NSDescription=null trust input} [-50]
TrustKitDemo-ObjC[3320:160146] [BoringSSL] boringssl_session_finish_handshake(306) [C1.1:2][0x10bd489a0] Peer was not authenticated. Disconnecting.
TrustKitDemo-ObjC[3320:160146] NSURLSession/NSURLConnection HTTP load failed (kCFStreamErrorDomainSSL, -9810)
TrustKitDemo-ObjC[3320:160146] Task <15E1F3B0-0B73-468A-9132-3E19048DDAE3>.<1> finished with error - code: -1200

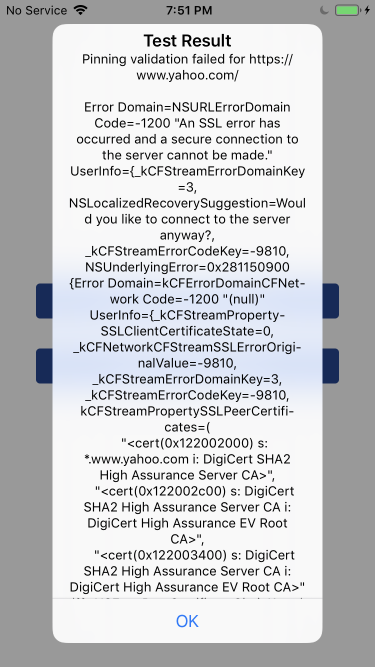
And then in the app itself, this first connection would fail with a different error than before:

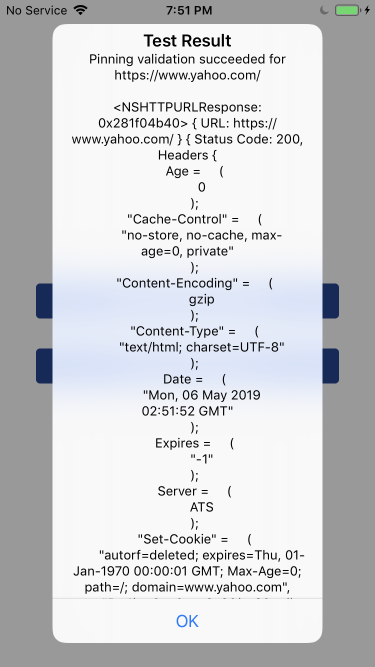
However, subsequent connections to the same server would succeed without triggering the pinning validation callback:

Hence I had bypassed pinning for all connections except for the very first one. Almost there…

Fixing the first connection

I needed more context to understand what the “Peer was not authenticated” error was, so I ended up pulling the shared cache (where all of Apple’s libraries and frameworks are, including BoringSSL) from my iOS 12 device, as described in this guide.

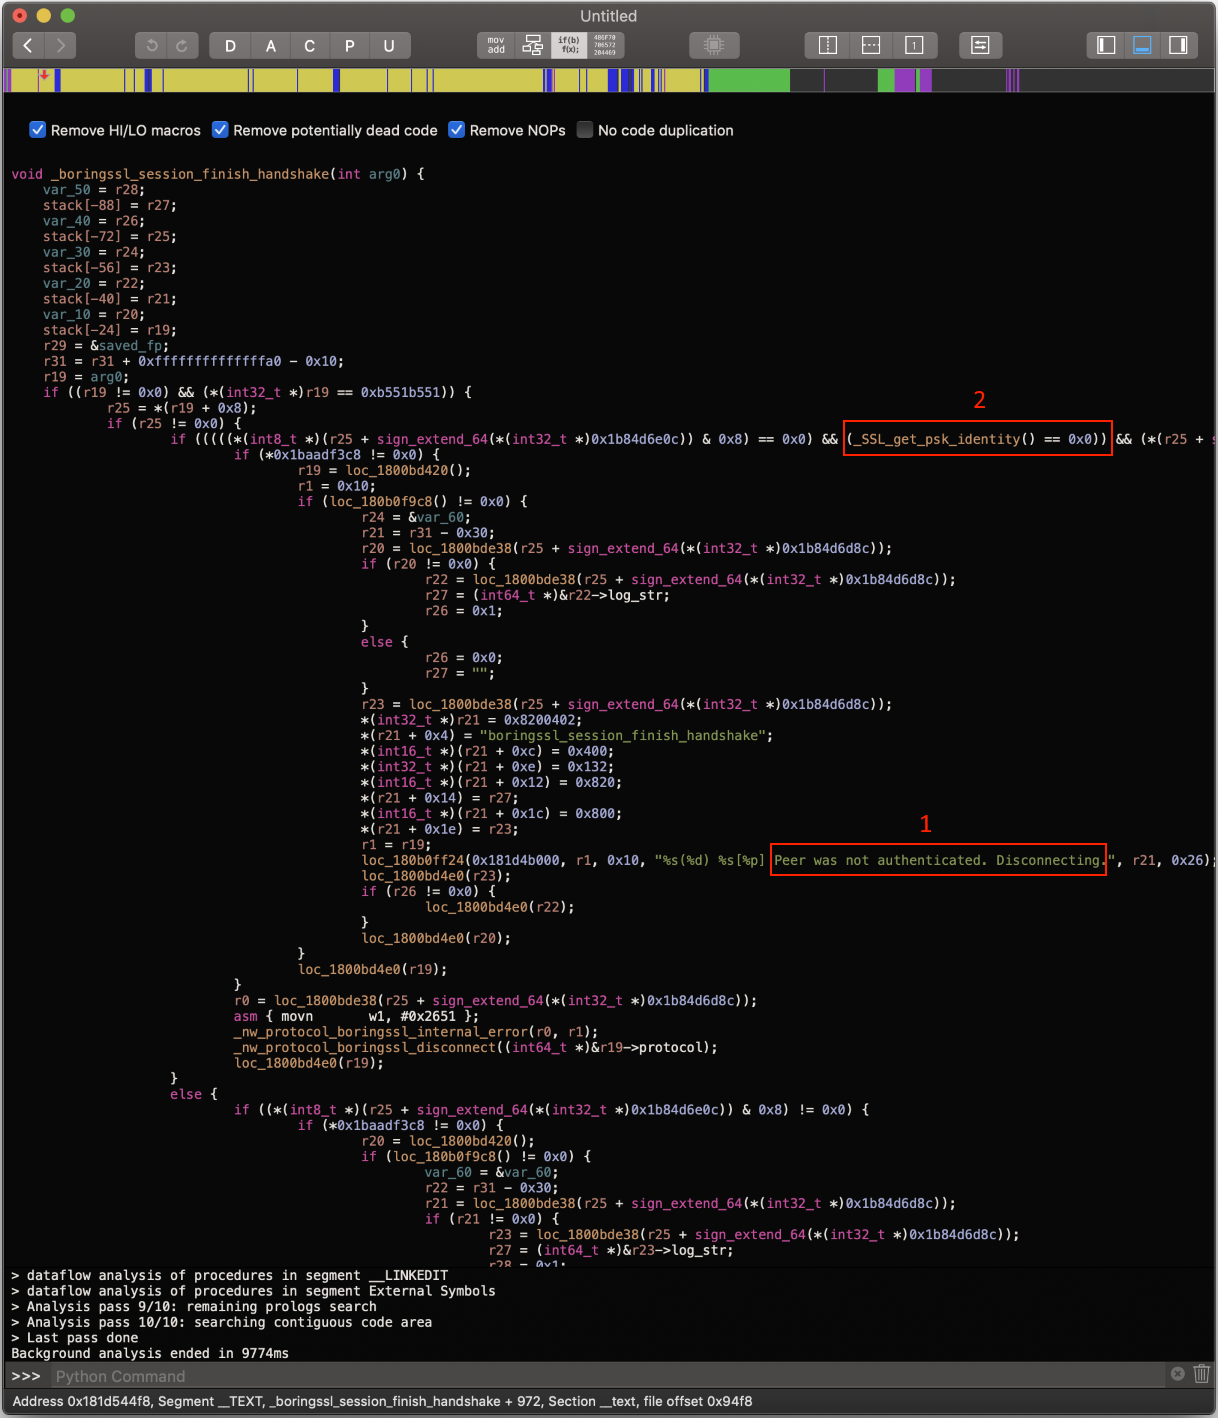
After loading libboringssl.dylib into Hopper, I was able to find the string for the “Peer was not authenticated” error (labelled as “1” in the screenshot), in a function called boringssl_session_finish_handshake():

I tried to understand what this function was doing to get a better understanding of the error itself, but since I barely understand arm64 (or any) assembly, I couldn’t figure it out. I tried a few other approaches (such as patching the boringssl_context_certificate_verify_callback() itself) but didn’t find anything that worked.

As I was running out of week-end time I can allow myself to spend on this, I went for a more desperate approach. If you look again at the decompiled boringssl_session_finish_handshake() function, you can see two “main” code paths, conditionally triggered by an if/else statement, with the “Peer was not authenticated” error happening in the “if” code path but not in the “else” path.

A naive attempt would be to prevent the code path with this error from ever being run, ie. the “if” path. As seen in the screenshot, one condition that does trigger the “if” branch is (_SSL_get_psk_identity() == 0x0) (labelled as “2” in the screenshot). What if we patched this function to not return 0, in order to force the execution of the “else” code path (which doesn’t trigger the “Peer was not authenticated” error)?

The MobileSubtrate patch for this looks like this:

// Use MobileSubstrate to replace SSL_get_psk_identity() with this function, which never returns 0:
char *replaced_SSL_get_psk_identity(void *ssl)
{
    return "notarealPSKidentity";
}
MSHookFunction((void *) SSL_get_psk_identity, (void *) replaced_SSL_get_psk_identity, (void **) NULL);

After injecting this runtime patch into my test app, it worked! Even the first connection succeeded, and my app’s validation callback was never triggered. I had bypassed my app’s SSL pinning validation code by patching BoringSSL.

Conclusion

This is obviously not a very clean runtime patch, and while everything seems to work fine after applying it (which is surprising), it triggers errors that can be seen in the logs whenever the app opens a connection:

TrustKitDemo-ObjC[3417:166749] Failed to clone trust Error Domain=NSOSStatusErrorDomain Code=-50 "null trust input" UserInfo={NSDescription=null trust input} [-50]

The patch has other problems too:

  • It probably messes up code related to TLS-PSK cipher suites, which is when the SSL_get_psk_identity() function is actually used. However, these cipher suites are rarely used, especially in mobile applications.
  • The default BoringSSL callback that is part of the iOS network stack, boringssl_context_certificate_verify_callback(), is never called. This means that some state within the iOS networking stack is probably not getting set properly, which should lead to bugs.

Lastly, there are a few extra things I didn’t have time to do:

  • Double checking that my BoringSSL runtime patch does disable pinning for lower-level iOS networking APIs, such as Network.framework or CFNetwork.
  • Adding support for macOS. I am pretty sure the patch itself should work as it is, but I haven’t found a way of hooking BoringSSL (or any C function in the shared cache) on macOS. The tool I was using previously, Facebook’s fishhook, does not seem to work anymore.

That’s all! Head to the project’s repo to see the code and download the tweak.

May 18, 2019
ssl, ios

SSLyze 2.0.0 Released

I just released SSLyze 2.0.0, my Python library for scanning the SSL/TLS configuration of a server.

This release adds support for the final version of TLS 1.3, and also introduces a lot of behind-the-scene improvements that I am going to describe in this article.

Changelog

  • Dropped support for Python 2 and older versions of Python 3; only Python 3.6 and 3.7 are supported.
  • Added support for the final/official release of TLS 1.3 (RFC 8446).
  • Added beta support for TLS 1.3 early data (0-RTT) testing; see --early_data and EarlyDataScanCommand.
  • Significantly improved the documentation for the Python API.
  • SSLyze can now be installed via Docker.
  • Bug fixes.
  • Switched to a more modern Python tool chain (pipenv, pytest, pyinvoke).
  • Removed legacy Python 2/3 code and ported the code base to Python 3 only.

A modern Python toolchain

A lot of the changes I’ve implemented for this release had to do with using new/better Python tools that have been released since I initially started working on SSLyze eight years ago:

  • Type checker: I added type annotations to the whole code base using the typing module; strict type checking is then enforced in CI with mypy.
  • Build system: I re-implemented the build and tasks (testing, etc.) system using Invoke. SSLyze’s C module for accessing OpenSSL requires compiling various libraries (Zlib, OpenSSL, etc.) and the previous implementation was using custom Python code. With Invoke, the whole C module can be built using one command, on all supported platforms (Linux, Windows, etc.).
  • Test runner: I switched to pytest as the test runner; it provides more options and a lot more details when a test fails, and is overall superior to the standard library’s unittest module. Even the unittest’s documentation mentions pytest as a better solution. The next step will be to migrate the actual code within SSLyze’s test suite from unittest to pytest (which provides an API for tests that’s a lot cleaner).
  • Dependencies management: I switched to Pipenv for dependency and virtual environment management. It replaces pip and virtualenv, and makes things a lot simpler. Additionally, GitHub’s Dependency graph feature supports Pipenv, and can automatically detect dependencies that have known vulnerabilities; pretty cool!

Modernizing the toolchain will make it a lot easier to maintain and extend SSLyze, and makes the code base a lot more approachable to developers who may be interested in contributing.

OpenSSL: double the fun

Following the discovery of the Heartbleed vulnerability in 2014, the OpenSSL team decided to start aggressively dropping support for TLS features or protocols that are insecure and should not be used. This is obviously a very good thing for the Internet, but it also makes the job of scanning servers for TLS issues more difficult.

For example, SSLyze relies on OpenSSL to try to perform SSL 2.0 handshakes in order to find servers that support this legacy protocol. Once OpenSSL stopped supporting SSL 2.0 (which, again, is a good thing), any future release of OpenSSL could no longer be used by SSLyze.

The solution I ended up implementing is to package not one but two (!!) versions of OpenSSL within SSLyze (more specifically within nassl, its C module for accessing OpenSSL):

  • A “legacy” version of OpenSSL, 1.0.1e. This is the last OpenSSL release that supports all the insecure features and protocols, and the version SSLyze uses to scan for things like Heartbleed, SSL 2.0, CCS injection, etc.
  • A “modern” version of OpenSSL, 1.1.1. This version was released only a few days ago, and is the version SSLyze uses to scan for modern TLS features, such as TLS 1.3 and early data.

This approach ensures that moving forward, SSLyze can scan for both legacy TLS issues, and new features and protocols.

More details

For more details, head to the project’s page or the Python documentation.

October 06, 2018
ssl

Security and Privacy Changes in iOS 12

This year and for the first time, I actually went to the Apple WWDC conference, in San Jose. The conference was quite interesting, and gave me the opportunity to meet some of the members of the Apple security team.

Here are some notes about the security and privacy changes brought by iOS 12 that I thought were interesting.

Automatic strong passwords

The “Automatic Strong Passwords and Security Code AutoFill” session describes various enhancements made to the iOS built-in password management functionality.

Automated password generation

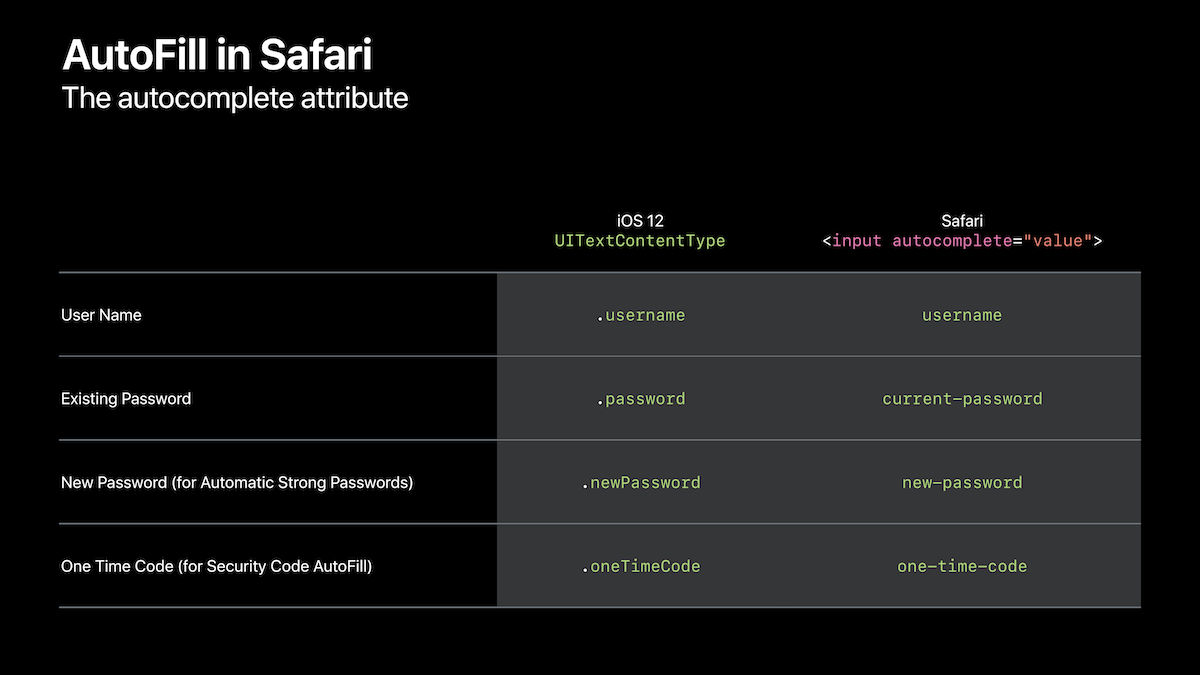
Starting with iOS 11, developers can “label” the username and password field in their app’s login screen:

let userTextField = UITextField()
userTextField.textContentType = .username

let passwordTextField = UITextField()
passwordTextField.textContentType = .password

This allows iOS to automatically login the user with the credentials they previously saved in their iCloud account, if the app has been properly associated with its web domains.

With iOS 12, a strong password can automatically be generated and stored when creating a new account in an app or in Safari. This functionality can be enabled by using the .username and the iOS 12 .newPassword content types in your “Create Account” screen:

let userTextField = UITextField()
userTextField.textContentType = .username

let newPasswordTextField = UITextField()
newPasswordTextField.textContentType = .newPassword

let confirmNewPasswordTextField = UITextField()
confirmNewPasswordTextField.textContentType = .newPassword

iOS 12 will then prompt the user to automatically generate a strong password during the account creation flow.

Any password that was automatically generated will contain upper-case, digits, hyphen, and lower-case characters. If your backend has limitations in the characters it allows in passwords, you can define a custom password rule in your app via the UITextInputPasswordRules API:

let newPasswordTextField = UITextField()

...

let rulesDescriptor = "allowed: upper, lower, digit; required: [$];" 
newPasswordTextField.passwordRules = UITextInputPasswordRules(descriptor: rulesDescriptor)

Apple has also released an online tool to help with writing password rules.

Similar labels can be used in a web page that Safari can leverage:

Autofill

Automated 2FA SMS codes input

iOS 12 also introduces a content type for the text field that will receive 2 factor authentication codes received via SMS:

let securityCodeTextField = UITextField()
securityCodeTextField.textContentType = .oneTimeCode

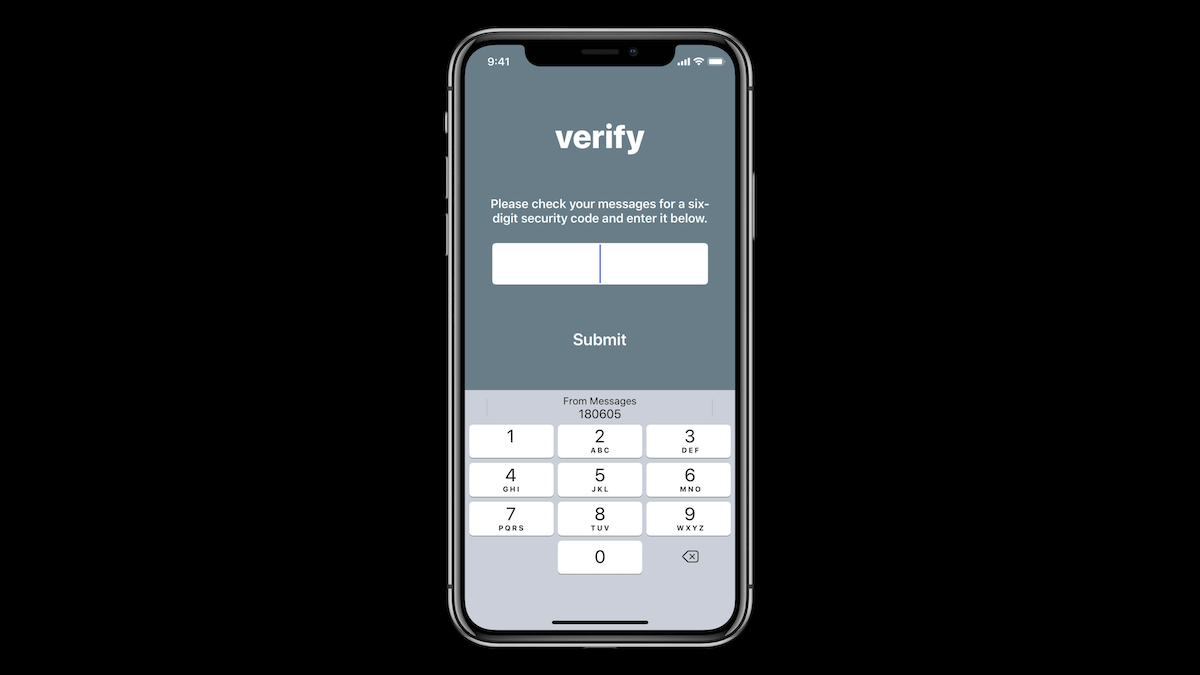
Enabling this content type allows iOS to automatically fill in a 2FA code previously received via SMS (with a user prompt), which is pretty cool:

Autofill

Federated authentication

iOS 12 introduces a new ASWebAuthenticationSession API for automatically handling an OAuth login flow.

Given an OAuth URL (ie. where to start the authentication flow), the API will:

  • Direct the user to the OAuth provider’s authentication page.
  • Have the user then log into their account on the provider’s page. As the API uses the same cookie store as Safari, the user may already be logged into their account; if that’s the case, the user will be prompted to confirm that they want to re-use their existing session in Safari, making the flow really quick.
  • Allow the user to review the OAuth permissions requested by your app, and grant access via the OAuth authorization prompt.
  • Return the user to your app and provide the callback URL, which contains the user’s authentication token if the flow was successful.

It was stated during the WWDC presentation that ASWebAuthenticationSession is now the “go-to way to implement federated authentication and it replaces SFAuthenticationSession”, which was deprecated in iOS 12.

Credential Provider Extension

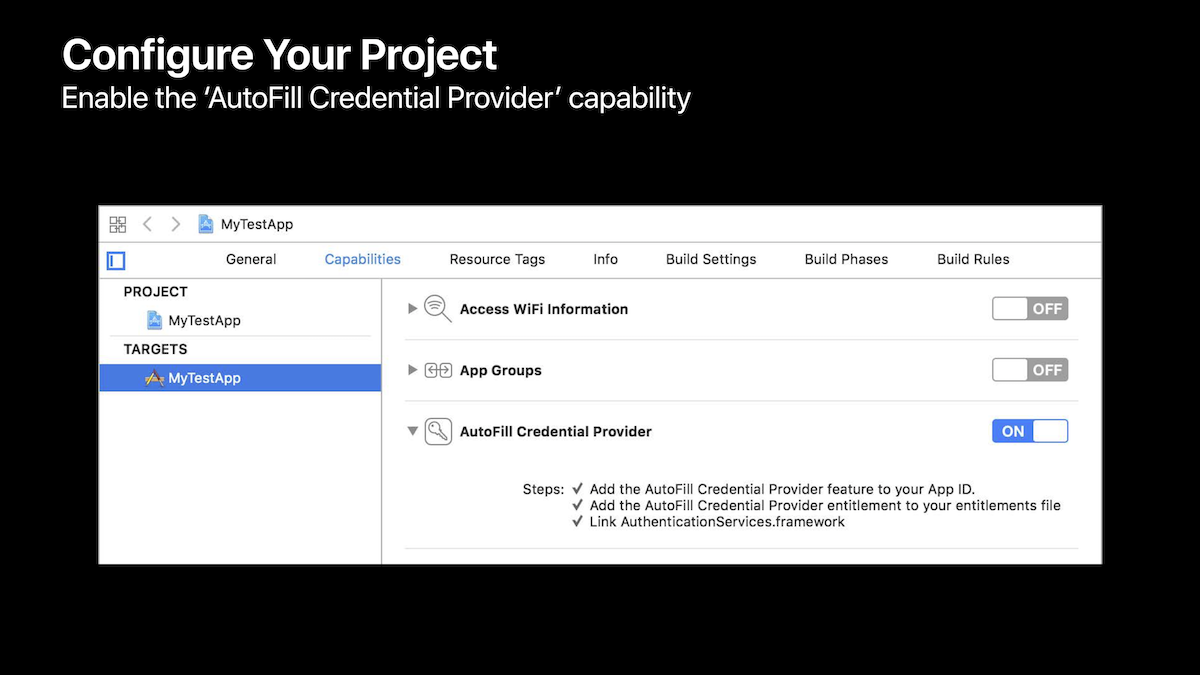
All the password management improvements described above apply to the built-in password manager in iOS and Safari, the “iCloud KeyChain”. However, third-party password manager applications (such as LastPass, 1Password, etc.) can also get integrated into the password flows on iOS, via a new extension point called “Credential Provider Extension”.

Credential Provider Extension

This extension point and the corresponding APIs are all part of the new AuthenticationServices framework available on iOS 12. This framework allows providing a UI for user to choose their password when authenticating into an app, storing a newly-created password, etc.

The framework is described in details in the “Implementing AutoFill Credential Provider Extensions” presentation.

Secure object de-serialization

At WWDC this year, a whole presentation was dedicated to secure object serialization and de-serialization: “Data You Can Trust”.

When an application has some logic to receive arbitrary data (for example over the Internet) and to then de-serialize the data into an object, care must be taken when implementing this logic. Specifically, if the raw data can choose any arbitrary class as the the object it gets de-serialized to, this can lead to remote code execution. This type of vulnerability affects almost every language and framework, for example Apache and Java, Ruby on Rails, or Python’s pickle module.

In iOS applications, object (de-)serialization is usually implemented using:

  • The NSCoding protocol, which allows the developer to implement the serialization logic for their own classes.
  • The NSKeyedArchiver class which takes an object that implements NSCoding and serializes it into a specific file format called an archive, which can then be stored for example on the file system. The NSKeyedUnarchiver class can then be used to de-serialize the object.

This approach is vulnerable to the issue described above, referred to as an “object substitution attack” in the Apple documentation: the data gets de-serialized to a different object than what was expected by the developer.

To prevent such attacks, the following APIs were introduced in iOS 6:

  • [NSKeyedArchiver decodeObjectOfClass:forKey:], which allows the developer to pick the class the data will get de-serialized to before it occurs, thereby preventing object substitution attacks.
  • The NSSecureCoding protocol which extends the NSCoding protocol by adding the class method supportsSecureCoding:, in order to ensure that the developer is using the safe -decodeObjectOfClass:forKey: method to handle object serialization and de-serialization in their classes.

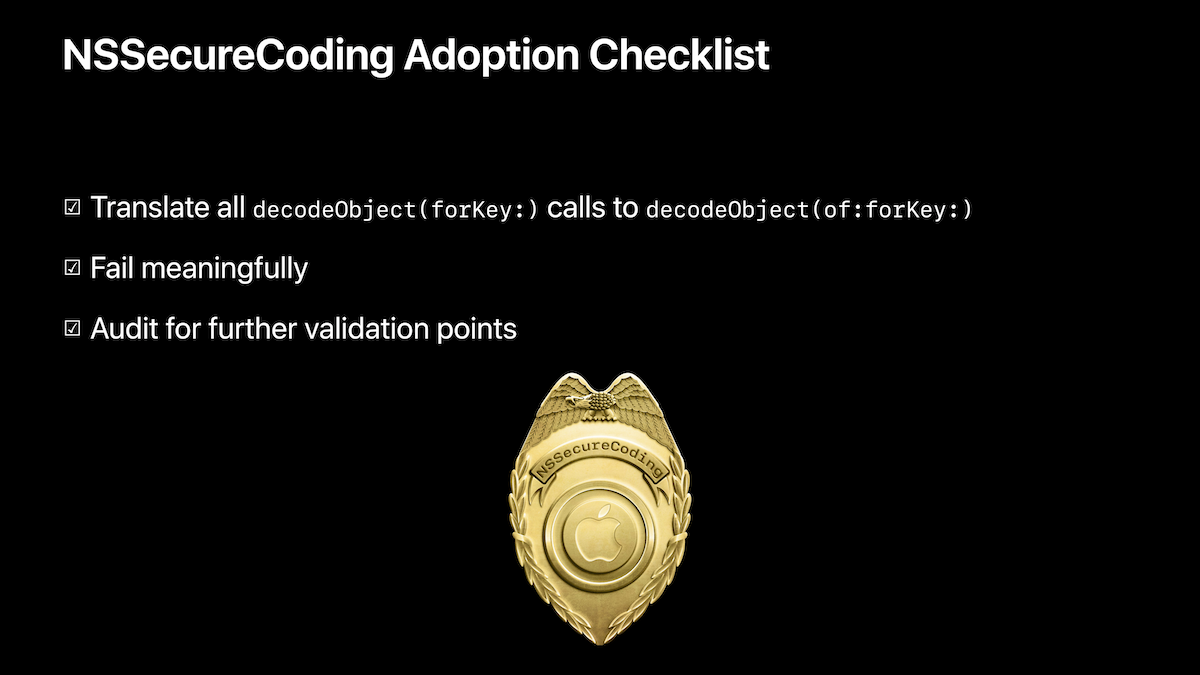
The “Data You Can Trust” presentation this year heavily emphasized NSSecureCoding and -decodeObjectOfClass:forKey::

Secure Coding

What has changed with iOS 12 is that [NSKeyedArchiver init] constructor is now deprecated; this was done to get developers to switch to the [NSKeyedArchiver initRequiringSecureCoding:] constructor instead, which has been made public on iOS 12 (but seems to be retro-actively available in the iOS 11 SDK). This constructor creates an NSKeyedArchiver that can only serialize classes that conform to the NSSecureCoding protocol, ie. objects that are safe to serialize and de-serialize.

The Network framework

The Network framework, introduced somewhere around iOS 9 or 10 has become a public API on iOS 12.

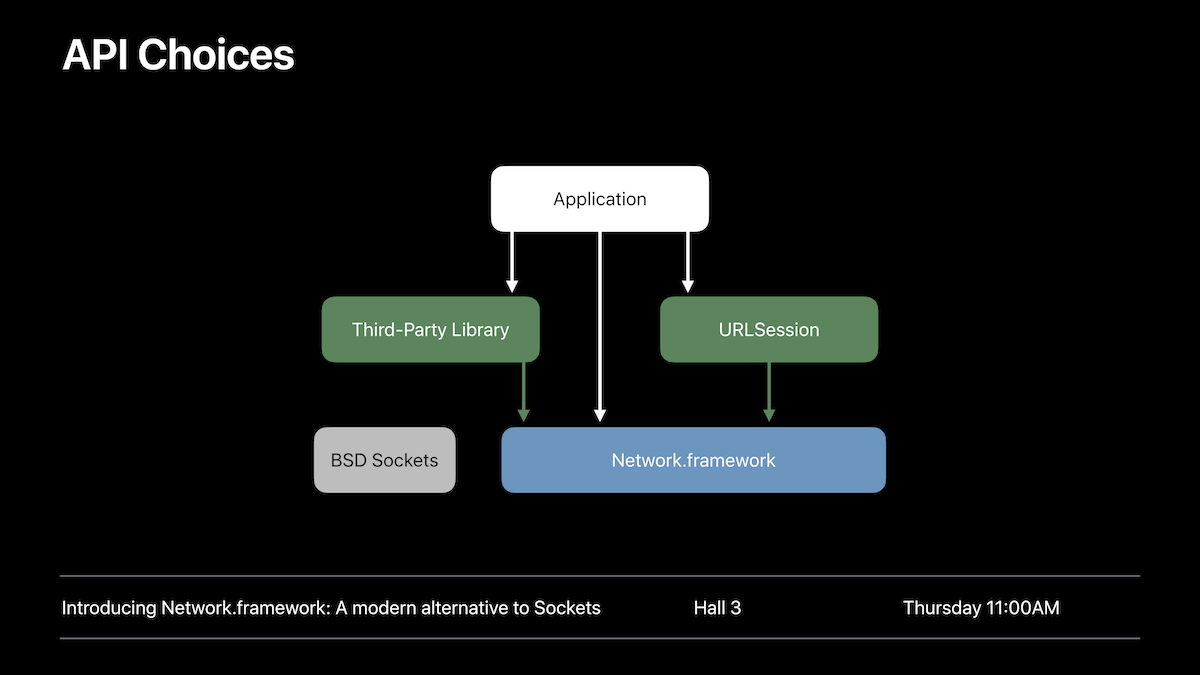
It is a modern implementation of a low-level networking/socket API. As stated in the documentation, it is meant to replace all the other low-level networking APIs available on iOS: BSD sockets, SecureTransport and CFNetwork:

“Use this framework when you need direct access to protocols like TLS, TCP, and UDP for your custom application protocols. Continue to use NSURLSession, which is built upon this framework, for loading HTTP- and URL-based resources.”

Network

More details about the Network framework are available in the “Introducing Network.framework: A modern alternative to Sockets” presentation.

Developers should expect the legacy network APIs (SecureTransport, etc.) to eventually get deprecated by Apple. Right now and as mentioned in the presentation, they are “discouraged APIs”.

The Network framework also comes with its own set of symbols for handling TLS connections, such as certificates, identities, and trust objects. They mirror the legacy SecureTransport symbols and can be used interchangeably. For example, a SecCertificateRef, which represents an X.509 certificate, is a sec_certificate_t in the Network framework. The sec_certificate_create() function can be used to turn a SecCertificateRef into a sec_certificate_t.

Lastly, App Transport Security is not enabled for connections using the Network framework, but will be “soon” according to Apple engineers.

Other changes

Deprecation of UIWebView

Starting with iOS 12, the UIWebView API is now officially deprecated. Developers that need web view functionality in their application should switch to the WKWebView API, which is a massive improvement over UIWebView in every aspect (security, performance, ease of use, etc.).

Unified Random Number Generation in Swift 4.2

Swift 4.2 introduces an API for generating random number, described in the “Random Unification” proposal.

Previously, generating random numbers in Swift was done by importing C functions that are insecure in most cases (such as arc4random()).

Enforcement of Certificate Transparency

Apple will be enforcing Certificate Transparency at the end of 2018 across all TLS connections on iOS. This does not require any changes in your application as the work to deploy CT has been carried out by the Certificate Authorities. More details are available in the “Certificate Transparency policy” article.

The CT enforcement will be deployed “with a software update later this year”.

Enforcement of App Transport Security

With iOS 9, Apple introduced App Transport Security (ATS), a security feature which by default requires all of an app’s connections to be encrypted using SSL/TLS. When ATS was first announced, it was going to be mandatory for any app going through the App Store Review process, starting on January 1st 2017. Apple later cancelled the deadline, and no further announcements about requiring ATS have been made.

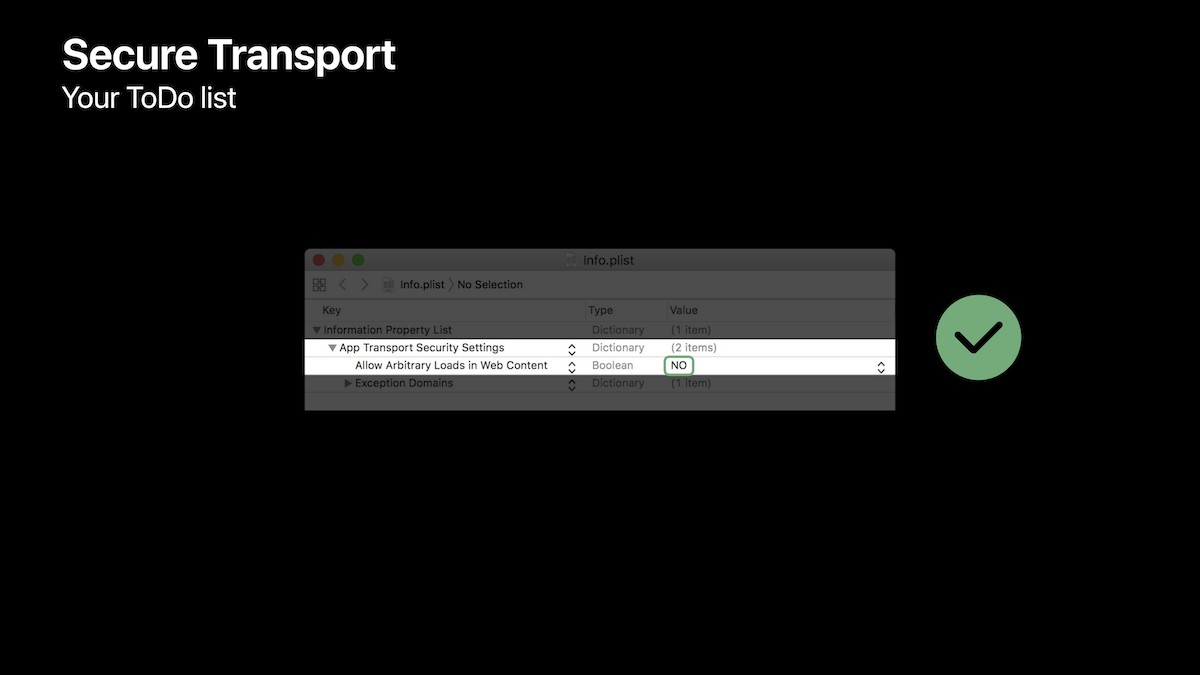
However, at WWDC this year, I learned that Apple has started reaching out to specific apps through the App Store review process, in order to ask for justifications and/or require the applications’ ATS policy to be stricter, especially having NSAllowsArbitraryLoads (the exemption that fully disables ATS) set to NO.

ATS

So what should I do?

If you are a developer, here is a summary of the changes to implement in your application, based on all the iOS 12 features described in this article.

Short term

  • Add support for Password Autofill to your application. The “Enabling Password AutoFill on a Text Input View” article gives a good summary of the changes you need to implement in your app.
  • If your application’s ATS policy still sets NSAllowsArbitraryLoads to YES, modify your policy by adding the required exemptions and domains, in order to be able to set NSAllowsArbitraryLoads to NO. More details on how to achieve this are available in my ATS guide. Sooner or later, your application will get blocked if it enables NSAllowsArbitraryLoads.

Medium term

  • If your application is using NSCoding for object serialization, switch to NSSecureCoding in order to prevent object substitution attacks.
  • If you application is using the now-deprecatedUIWebView API, switch to WKWebView.

Long term

  • If your application is using a low-level network API (such as BSD sockets, SecureTransport or CFNetwork) switch to the Network framework.

Note: I also published this article on Data Theorem’s technical blog.

June 14, 2018
ios

Introducing the Trust Stores Observatory

For anyone interested in SSL/TLS, certificates, and trust, it has always been surprisingly difficult to get the list of root certificates trusted on each of the major platforms (Mozilla, Microsoft, etc.).

The only tool that I am aware of is the Certification Authority Trust Tracker (CATT), which I have been using for many years in order to retrieve the root stores to be used in SSLyze, the SSL scanning tool I work on. However and as useful as it has been, CATT has to be run manually every time, and is not easy to extend or troubleshoot as it relies on several scripts written in Bash or Perl.

Because it shouldn’t be this hard to retrieve and monitor the content of the main platforms’ root stores, I have been working on a new project called the Trust Stores Observatory; it provides the following features:

  • An easy way to download the most up-to-date root certificate stores, via a permanent link: https://nabla-c0d3.github.io/trust_stores_observatory/trust_stores_as_pem.tar.gz.
  • The ability to record any changes made to the root stores, by committing such changes to Git. This way we can keep the history of the root stores and for example keep track of when a new root certificate was added.
  • The ability to review and compare the content of the different root stores, by storing the content of each store in a YAML file.

Supported platforms

The Trust Stores Observatory currently supports the following platforms:

How it works

The project is implemented using Python 3.6. Each root store is stored in a YAML file in the project’s repository; the YAML file contains the subject name and the fingerprint of every trusted and blocked root certificate.

Once a week, a Travis cron is automatically run in order to retrieve the latest version of each root store, and to commit any changes to the observatory’s repository.

What’s next?

  • Support for additional platforms and root stores (Java, Ubuntu, etc.).
  • Support for also retrieving the list of EV OIDs.
  • Better handling of special restrictions (name constraints, notBefore, etc.) as several platforms have implemented custom restrictions for some CA certificates.

Check it out

Head to the project’s page for more information and feel free to reach out if you have questions or feedback!

January 16, 2018
ssl

Scanning for the ROBOT Vulnerability at Scale

I just released SSLyze 1.3.0, which adds support for scanning for the ROBOT vulnerability that was disclosed last week.

Using SSLyze’s Python API, it is possible to easily and quickly scan a lot of servers for the vulnerability. From my own testing and depending on the network conditions, it takes about 5 seconds to scan 20 servers. SSLyze also has the ability to scan servers that use StartTLS-based protocols (such as SMTP, XMPP, etc.), which the test script released along with ROBOT does not support.

The following script (tested on Python 3.6) demonstrates how it can be done:

Enjoy and happy scanning!

December 17, 2017
ssl

Mobile TLS Interception Presentation at BlueHat

Earlier today, Thomas Sileo and myself presented at the Microsoft BlueHat conference in Redmond.

The title of the talk was “Where, how, and why is SSL traffic on mobile getting intercepted? A look at ten million real-world SSL incidents”. This is a research project we’ve been working for a couple years; we’ve analyzed pinning failure reports that mobile developers who use TrustKit in their apps have shared with us.

So far, we’ve received about 10 million reports coming from devices all around the world, and we’ve discussed some of the results of our analysis in this presentation.

The slides are now available for download here.

November 08, 2017
ssl